Documentación Mercado Libre
Descubre toda la información que debes conocer sobre las APIs de Mercado Libre.
Documentación
Create an application on Mercado Libre
Before creating an application, make sure that the account you are using is the owner's account in the solution to be developed, thus avoiding account transfer problems in the future. It is recommended that the account is created under a legal entity of the company, thus avoiding future account transfer problems.
These are the steps to create an application within Mercado Libre, which will allow you to access our ecosystem of public APIs from an integration:
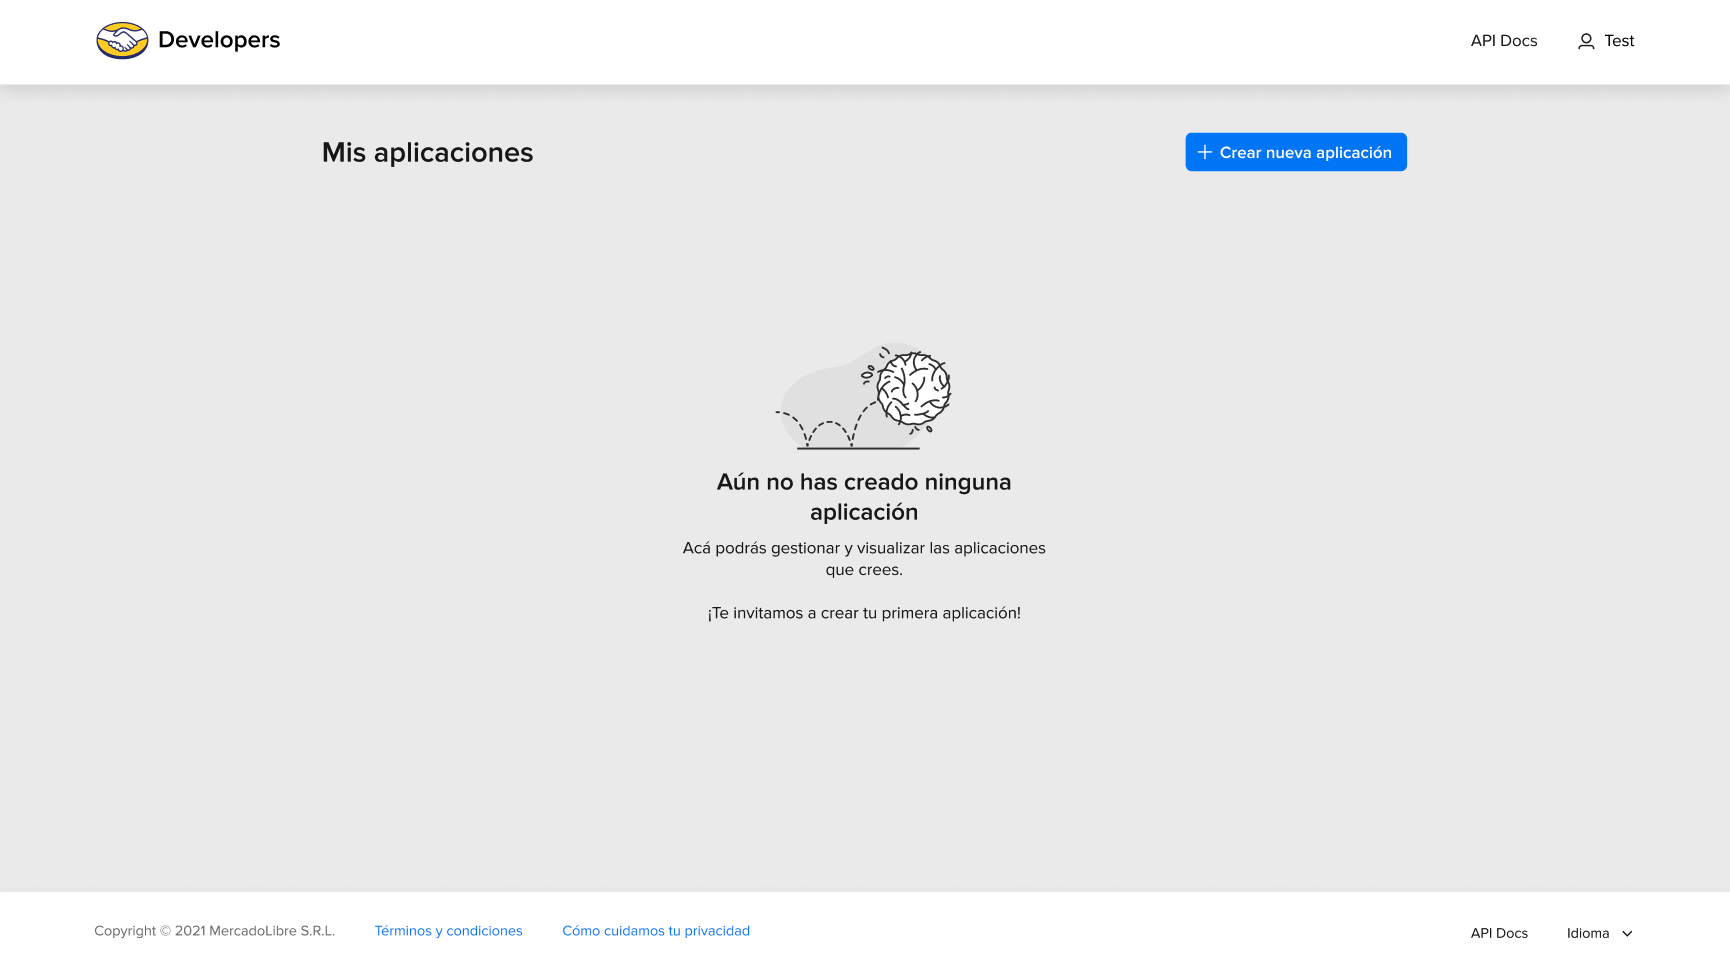
- Access our "DevCenter".
- Click on "Crear nueva aplicación", and fill out all the mandatory fields.
- En URIs de redirect the possible redirect URIs are added where the Code of the authorization received will appear. Complete with the domain root.
- Scopes
- Reading: allows the use of API GET HTTPS methods.
- Offline access: allows you to make a server side request and refresh token.
- Writing: allows the use of API PUT, POST and DELETE HTTPS methods.
- Tópicos: contains a checklist that classifies by specific subjects, where you’ll be able to select only the interests you've marked in "Receive notifications" and in the “Callback URL Notifications” field you have to set up a route to receive these notifications.
- Orders
- Messages
- Items
- Catalog
- Shipments
- Promotions
- Save the project and you’ll be redirected to the home page where we’ll include your application. You can check your application’s ID and Secret Key displayed by your application. With these data, we can begin our integration.
Basic application details
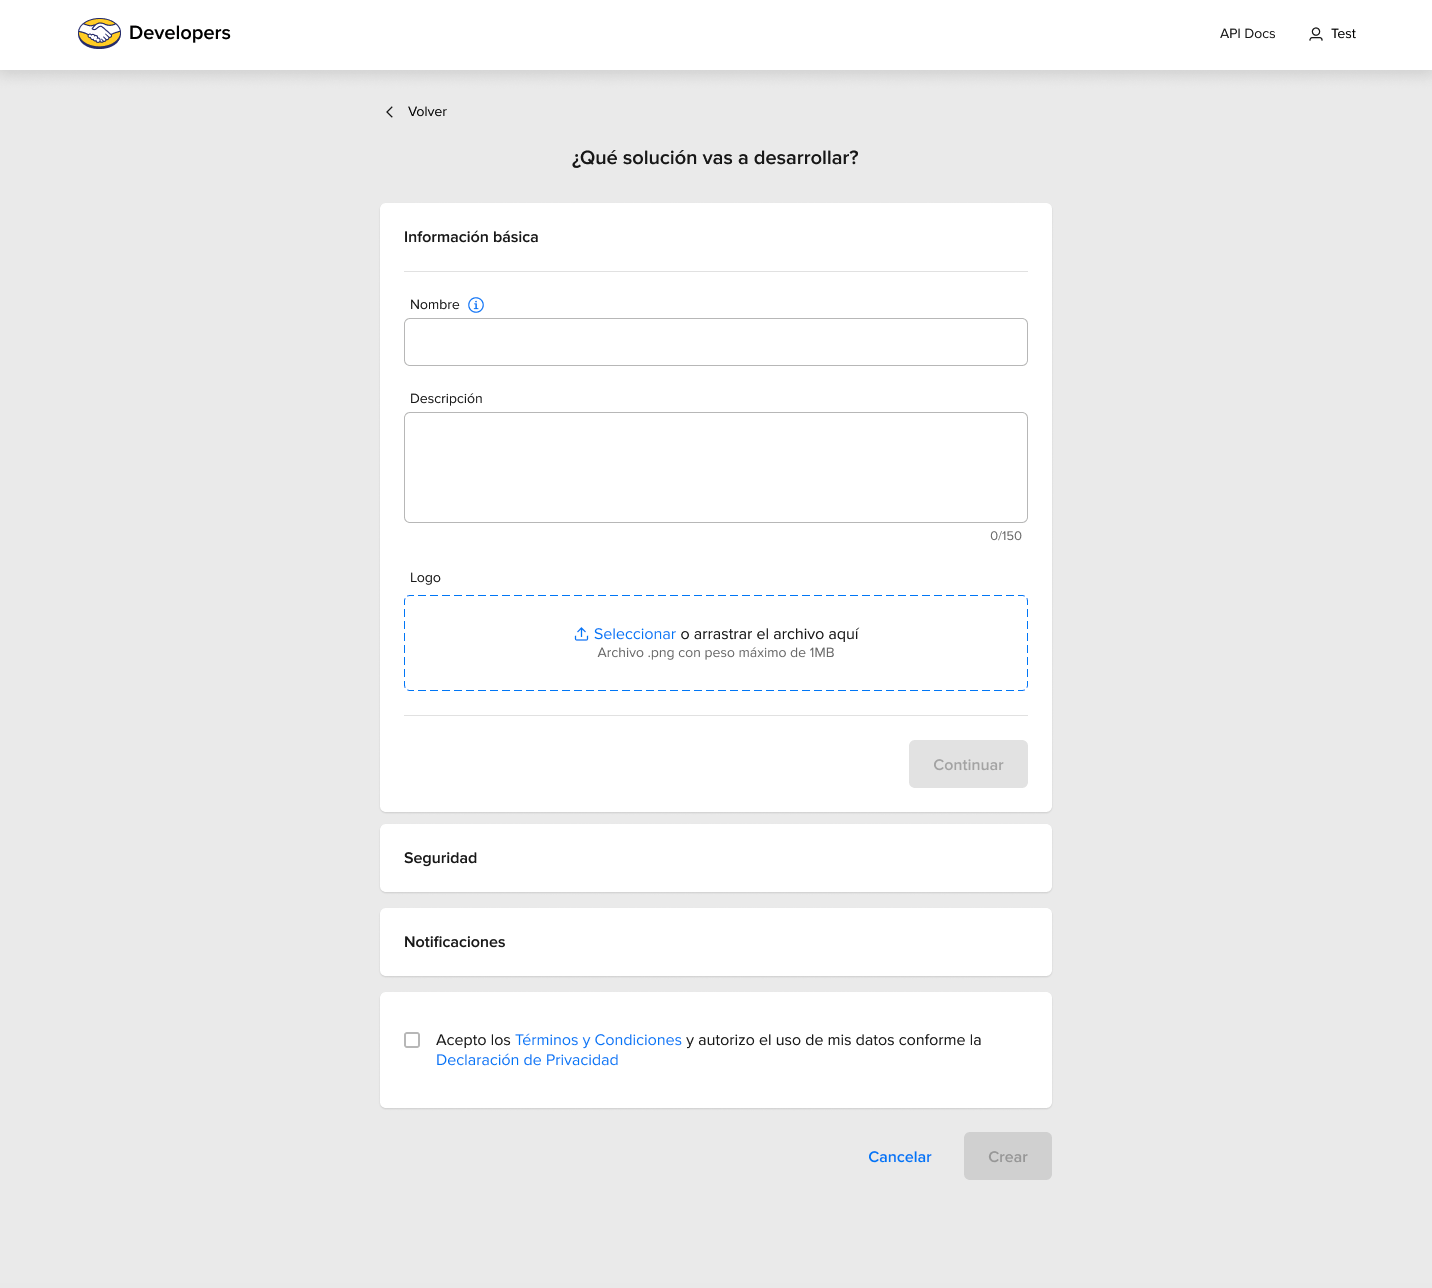
Name: name of your application. It must be unique..
Description: this description (up to 150 characters) will be shown when the application requests authorization.
Logo: includes an image of your company with the informed dimensions.

Use PKCE (Proof Key for Code Exchange): this determines if the application will have PCKE validation active for token generation. This allows a second check to avoid authorization code injection attacks and CSRF (Cross-site Request Forgery), its use is optional but recommended.
Device Grant: This flow is used when applications request an access token, using only their credentials, to access their own resources, not on behalf of a user. The main difference with the other flows is that recurring calls are made for this token until the user completes the authorization process and the authorization token can be returned or until the time allotted for the flow is exceeded.
Learn more on scopes in this topic.
[LINK AL TÓPICO casi al final]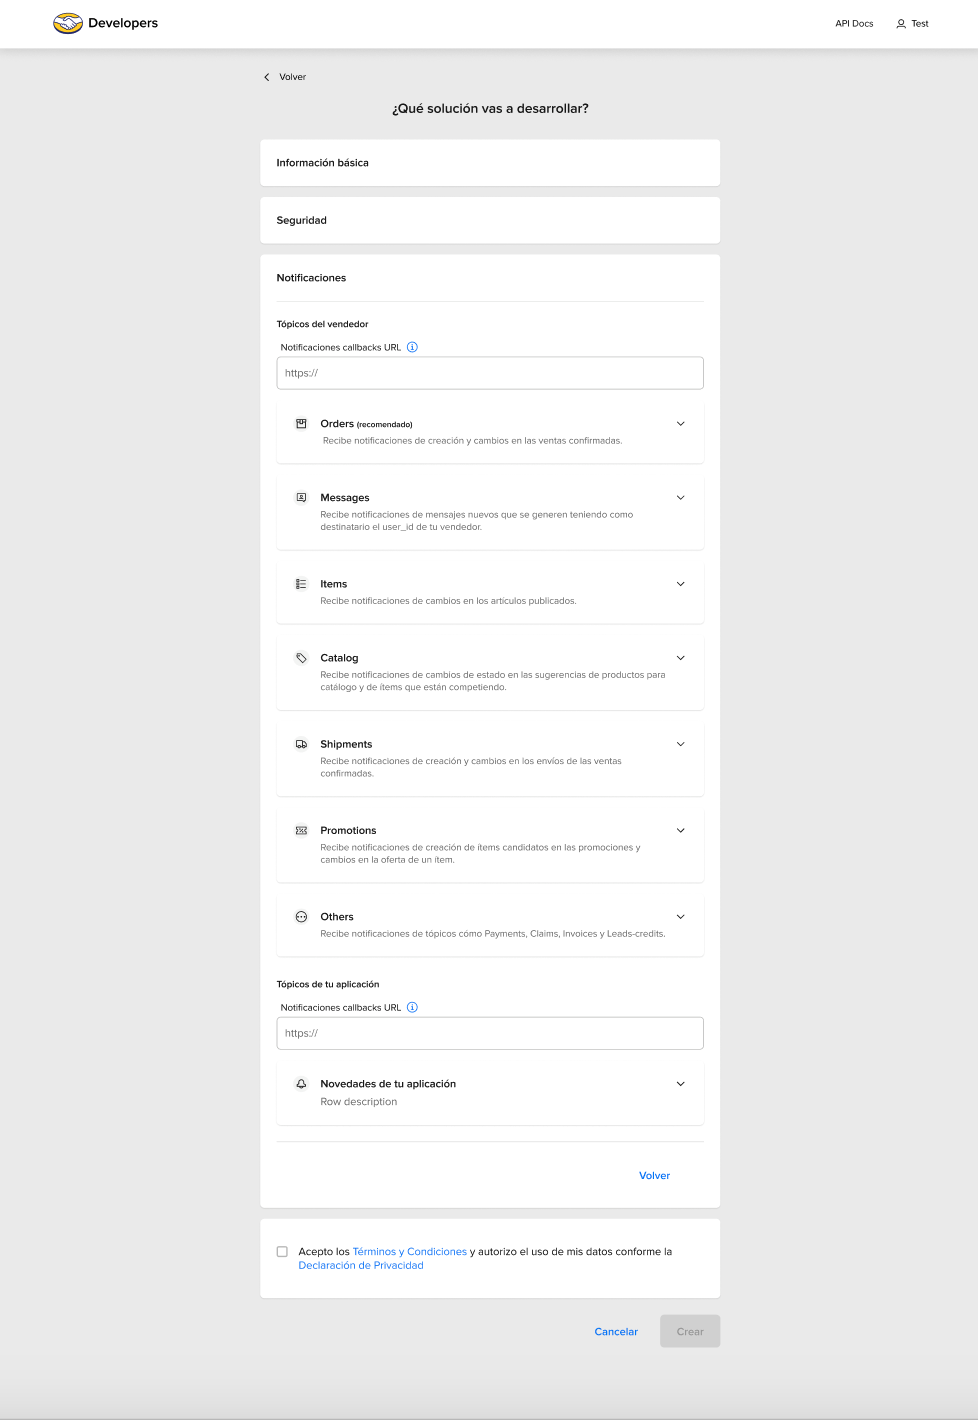
Topics: there are several, these are the main ones:
Mercado Libre makes requests for this route whenever a novelty takes place among the selected topics. Get more information by checking the notification documentation.
With the application created and correctly set up, you have to go through the authentication and authorization documentation to continue with its integration and to check how to generate a token.
Manage my applications
Once the application is created in Mercado Libre you can access it from the DevCenter. If you already have a generated application, head to the "Configure" view to access and manage your application.

Configure
There are four groups of information in this form:
- Application settings
- Basic application information
- Authentication and Security
- Notification settings
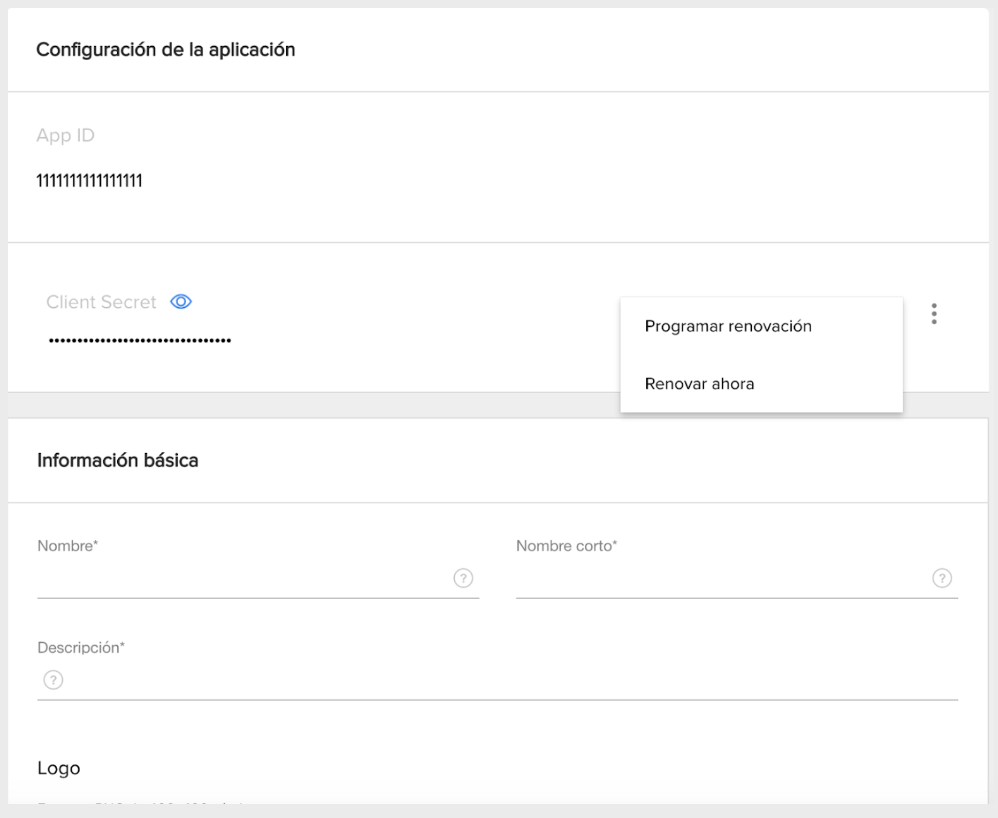
Application settings
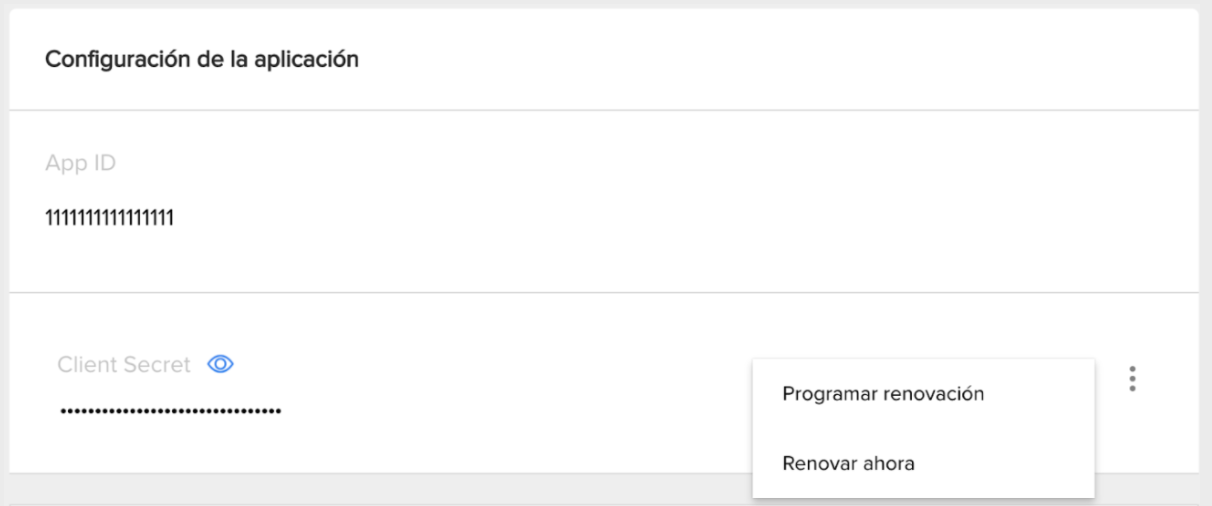
client id: APP ID of the application that was created.
client secret: password of your application in Mercado Libre. This code is secret, don’t share it with anyone .
schedule renewal: action to schedule the update of the Client Secret.
renew now: action for the renewal of the Client Secret in the moment.
Edit application
Whenever you want to modify the Client Secret you can do it manually by following these steps:
- Access the "Application’s settings".
- Change the mode to "Hide" or "Show the Client Secret ".
Click on the three-dotted menu and select one of the actions shown to schedule the renewal method for the Client Secret: "Renew now" or "Schedule renewal".
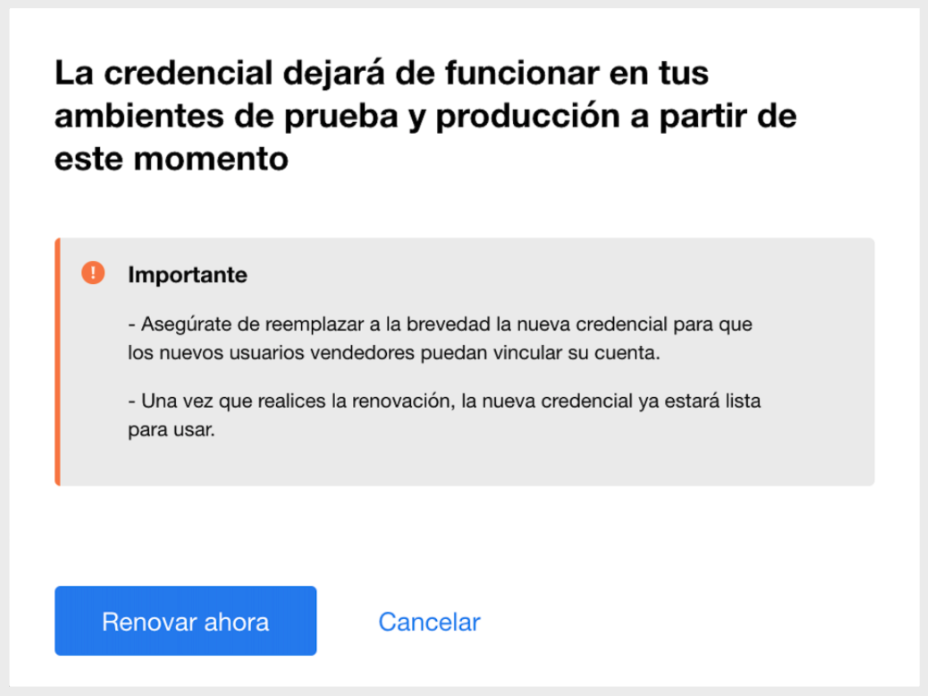
Renew now
This is the confirmation to perform the Client Secret renewal. By selecting this option, a new key will be automatically generated at that moment, the previous key will expire and the renewal will be performed.
We recommend updating the new key in your developments as soon as possible, because in that period of time new users who want to give permission to the application will face an error.
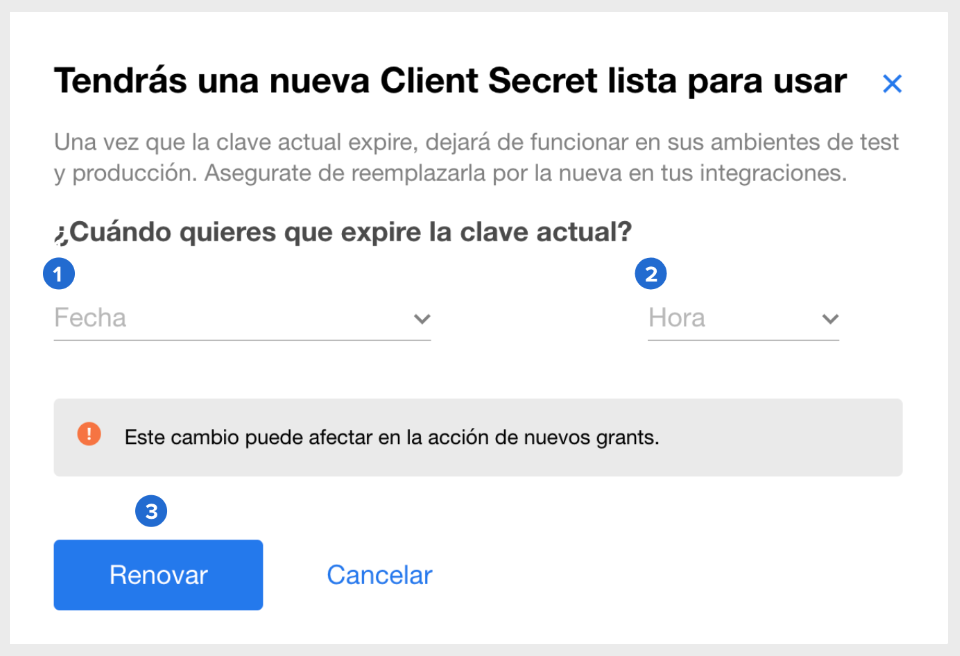
Schedule renewal
This is the option we recommend using since it maximizes the security of your integration. You will have the possibility to prepare your development and its different environments (development/test) for the key change on the scheduled update date.
For this purpose:
- Select the expiration date for your current key, the selector will display up to seven days.
- You can also select the time, the selector will show options every 30 minutes.
- Lastly, click on Renew, to confirm the scheduled update of the Client Secret on the date and time you set up.
When scheduling the update, you’ll have two “valid” keys: new Client Secret and current Client Secret antes de que culmine el plazo.

On the other hand, once the confirmation is set for the scheduled update, you’ll have the “Cancel renewal” (action for the cancellation of the Client Secret renewal) or “Expire now” (action for the renewal of the Client Secret ) options available.
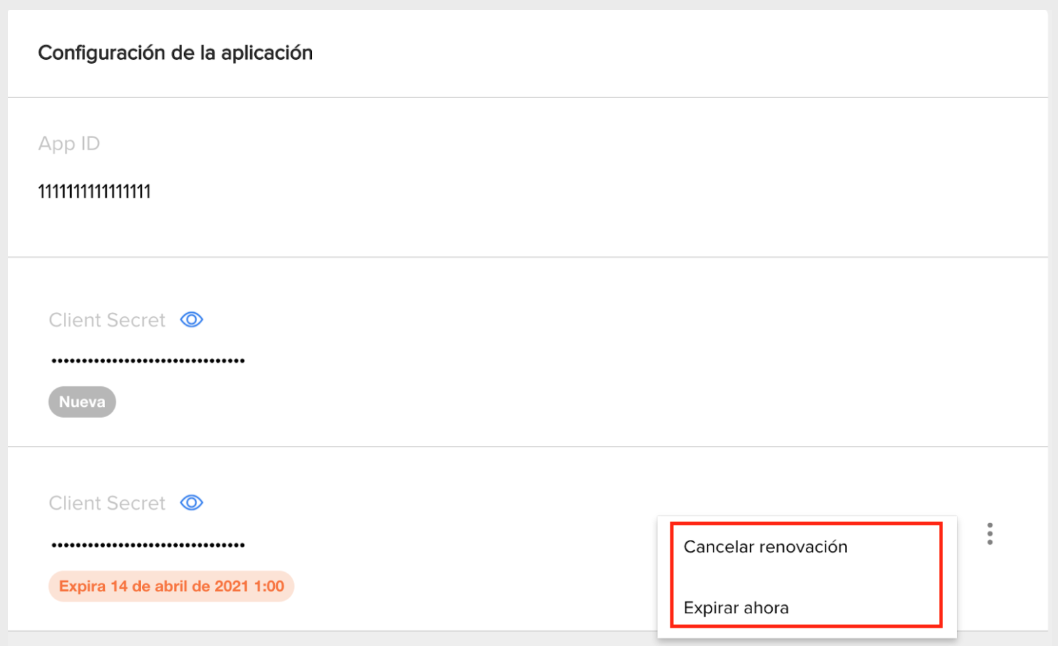
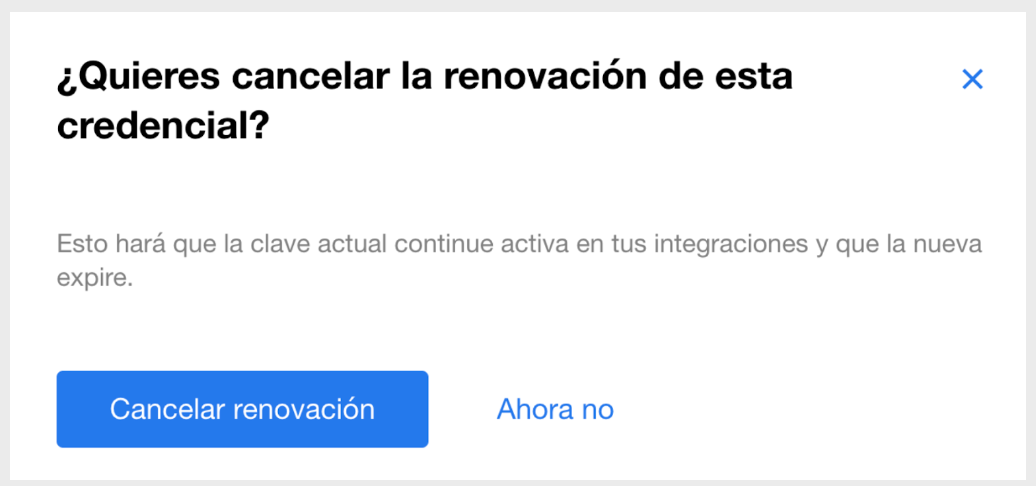
Cancel renewal
Once the Client Secret renewal has been scheduled, it is possible to cancel it. If the renewal is cancelled, the generated Client Secret will expire and the current Client Secret will remain valid.
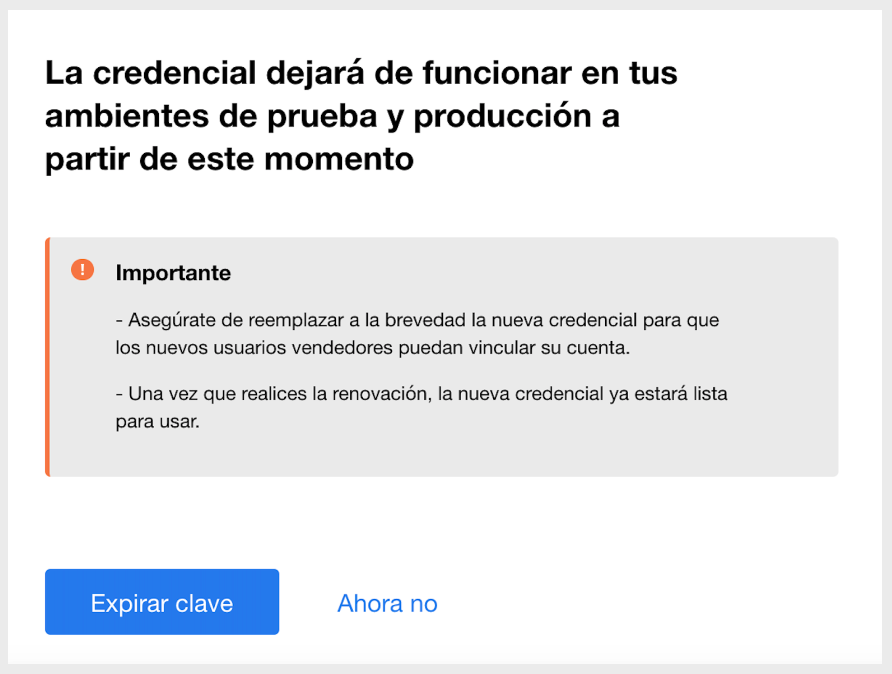
Expire Now
This action will allow you to bring forward the scheduled renewal, the new Client Secret is the one that remains functional and, at the same time, the current Client Secret will expire.
Considerations on scopes
There are several types of applications. However, we will divide them into three groups to explain the required scopes.
Read-only applications
Application that allows an anonymous or authenticated user to access protected MELI information. In this case, an anonymous user would be able to search for items, read descriptions, general information, etc. while an authenticated user can view the most privileged information. If you do not make any modifications to the MELI data (no updates to user information, listing items, or purchasing items), all you need is a read scope. Remember that any attempt to modify details through the MELI APIs will lead to an error.
Online read/write applications
This type of application allows an anonymous user to perform certain read-only operations in MELI, as well as allowing an authenticated user to modify details, listing new items (selling), tracking orders (ordering and shipping information), etc. In this case, the application requires a write scope so that the user can grant write permissions and the application acts on their behalf. The application will be able to modify details on behalf of the user as long as the access token is valid. Once expired, the user must renew the token to regain access.
Offline read/write applications
If your application must act on behalf of the user even when the user is offline, it will require offline access permission from the user. By requesting this scope, once accepted by the user, the application will have both the access token to act on behalf of the user and a refresh token to obtain a new valid access token when the old one expires.
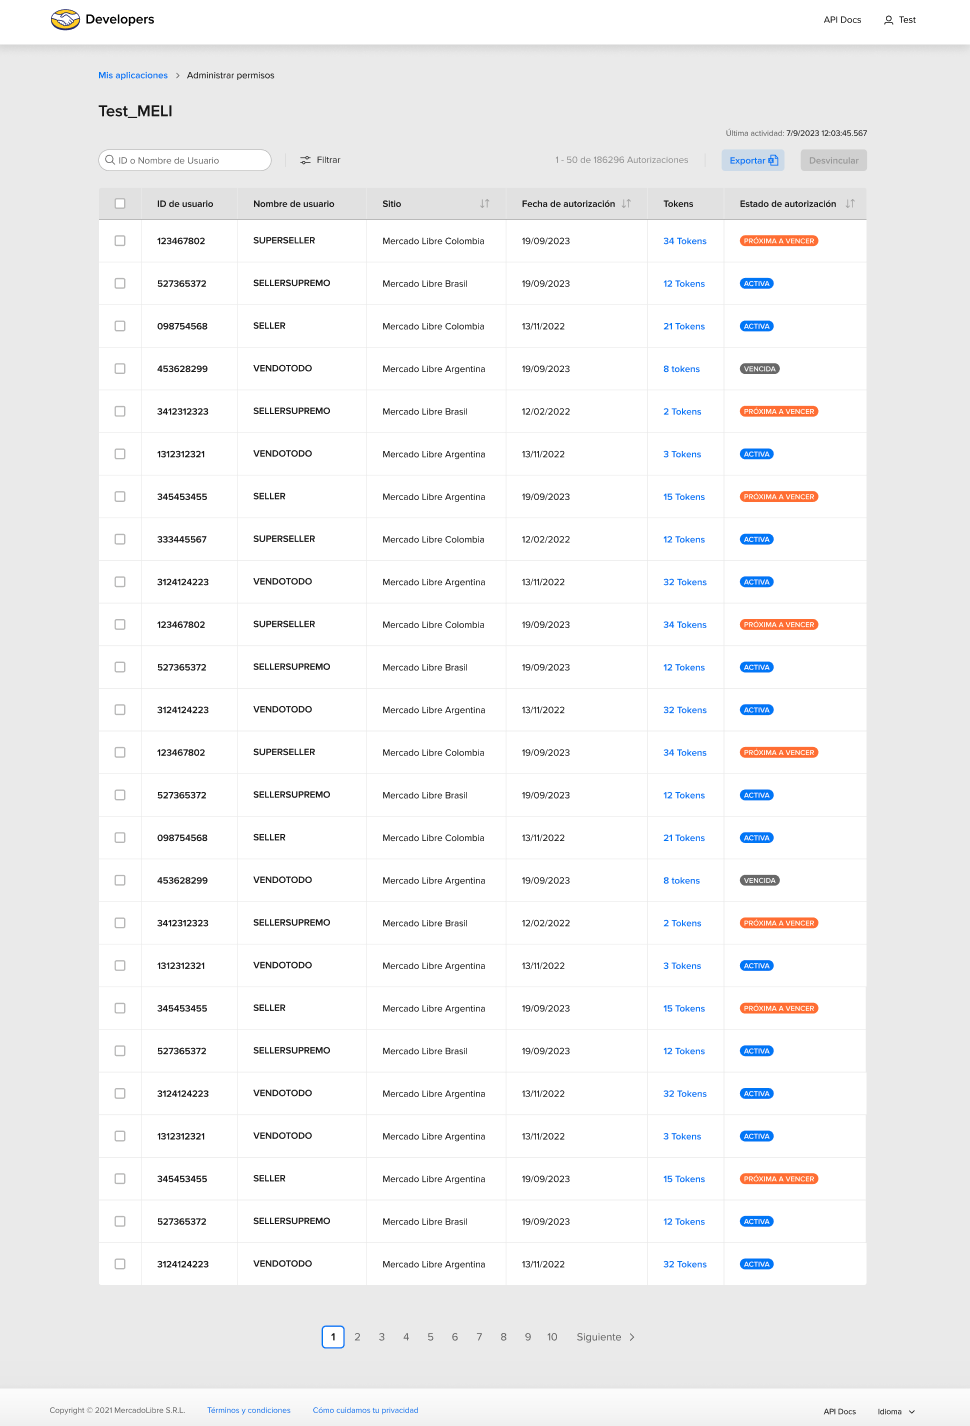
Manage permissions

You can access the list of users who gave permissions to your application.
New: authorization created in the last 24 hours.
Inactive (gray bullet): authorization not used for over three months.
Inactive (blue bullet): authorization not used for less than three months.
Active: authorization in constant use.
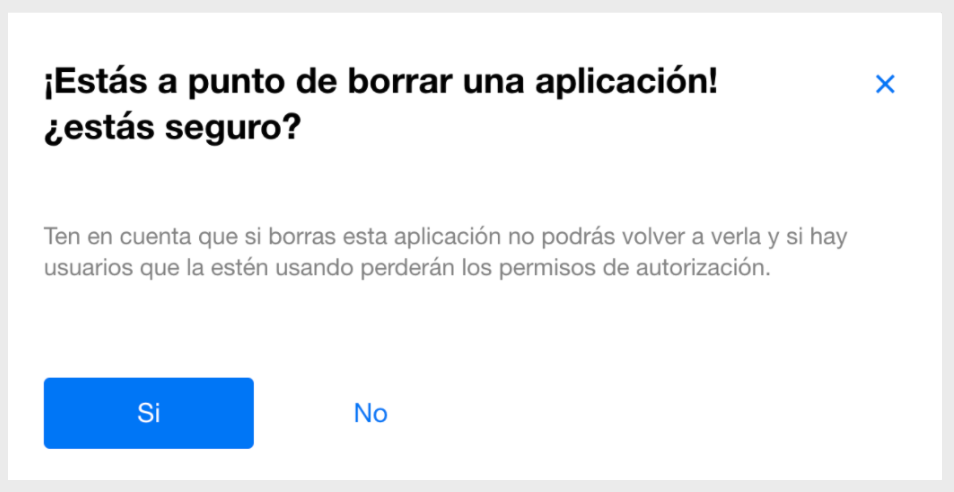
Remove

In “My applications” you have the option to Remove, which allows you to delete the application. Once this action is completed, there is no way to recover the removed application.
Learn more: about our certification program.
Next: Autenticación y Autorización.